Showing posts with label Ancient. Show all posts

Wednesday, 12 February 2025

First Lagash Regiments.

 Well thought I'd see how well my phone works for miniature picks as my camera looks like it has past on.

Off to buy a new one 😒

This is the first Lagash Regiments. Some skirmishing with Javelins others Bows, three Regiments of Spear, Guard with two handed Axes and the General.


The Bowmen doing their Job

The spearmen poking around really big shields.

The Guard. 
Who needs shields when you have really big axes and know how to use them.

Interested to see how these photos work out. 
Next will be the Umma Army. They even have a Regiment of Battle carts!


Saturday, 8 February 2025

Bronze Age Campaign

Age of Onagers

After a move and a lot of running around, I've begun assembling a long term Fictional Historical Campaign.  Beginning in Bronz age Sumer at approximately 2,400 BC. 

Or what I'm naming 1 SY. 

The rules have been designed as solo beginning with 6 major Cities.

This project is the product being gifted a copy of Tony Baths "Setting up a Wargames campaign" 50 years ago followed by many fun games of WRG 6th. Dear 13-year-old self, I look like finally making it.

Map  

Hopefully a quickly drawn map should appear below. 


The Diplomacy is all set to automatic though the first conflict has been set as a border dispute between Umma and Lagash. I intend to set up the royal houses while awaiting the arrival of the rest of my Sumerian figures. Just started painting my 12th regiment. Must dig out my camera, not that my painting skills are worth celebrating. :)

Tactical rules

After wrestling between my preferred rules, including creating a faster version of WRG 6th, I finally decided to create my own, owing much to the Lions Rampant and One page rules.  They are called "Galloping Onagers", are very simple and provide the flexibility to match any of the random scenarios I end up with, (even if that is just "meeting engagement"). 
Well I plan this as my final Wargame adventure. Hopefully it will eventually stretch to Egypt. 


Wednesday, 22 June 2016

Getting started with the Mitanni army

For the sake of consistency I have decided to use Essex 15s for my Mitanni army. And I was pleasantly surprise at some of the sculpting and variation in the figures.


Many credit the Mitanni with introducing the light archer chariot to the middle east.
They certainly are the real teeth of the army.

King Shuttarna. Mitanni Red Shields. Mitanni General.

Mitanni Blue shields.

 Syrian Levy Foot.


Saturday, 18 June 2016

Advance Guard Scenario: Egyptian V Canaanite

Eventually managed to test drive the Impetus rules using the Neil Thomas scenario No. 16 "Advance Guard" I added my usual random terrain, increased the size of the armies and tweaked the circumstances of the scenario.

The situation.

The Egyptians and Canaanites are both attempting to secure an oasis in northern Sinai.
Each armies advance guard is approaching the oasis through poor visibility.
Neither army will be able to leave the road until one side has reached the oasis.
At that point the sand storm lifts and its business as usual.
The Canaanite plan (on the left) was to secure the Oasis with skirmishers backed by
a band of light foot and use these to pick off the Egyptian heavier foot.
The Egyptian plan ( on the right) was to screen off the bottle neck between the soft sand and Oasis
with a small force, hook to their left with the Chariots supported by archers and
smash through the Canaanite centre with their spearmen.

The Canaanite host reaches the Oasis. The Chariots have all been discorded by quick movement.
Unfortunately they are being lead from the front by their General! 

The Egyptians have also fallen into disorder attempting to race to the Oasis.
They also have accidently placed their General (Yellow chariots) at the front.

The sand storm has cleared and both sides attempt to shake out into a battle formation!

The Canaanite General (Purple) is in the lead and disordered.
But manages to shoot and hit the Egyptian General. First blood!
Chariots, in these rules do not manoeuvre very well in close confines.  

The Egyptian General (Yellow) has managed to get clear of the traffic snarl.
However A) he doesn't want to be on the flank and out of command and B) has already taken a hit.

More chaos as both sides continue to spread out and arrows fly both ways. 

Accurate close range shooting by the Amun (Blue) Chariots and some Nubians Archers
wound the Canaanite General whose body guard rush from the field. A major blow!

Disorder makers everywhere as both sides attempt to reorganise.
The Canaanites are missing a General which is already hurting. 

The Canaanite red chariots charge and force the Egyptian General to retreat.
He now has two casualties. 

The Canaanites capture the Oasis.

With an exchange of archery the Yellow Canaanite Chariots  decide to follow their General home.


Suddenly the balance has tipped the Egyptian way on the open flank.

The Nubian Archers supported by the Egyptian Re Archers challenge for the Oasis.

The Egyptian Amun Archers shoot at and routs the Canaanite Green band. 

 The Re Spear finally gets to grips with the Yellow Band who just melt away on contact.

 The Re Archers cause the Green Skirmishers to rout!
The Canaanite army is falling apart!

 More grief as the  Amun Spear charge and disperse the Canaanite blue band!
Who at least manage to cause some casualties.

Suddenly the Canaanites are out numbered.


Desperate the Canaanites keep throwing units against Nubians and Re Archers.
Who just keep winning.
 There was one final Chariot clash on the flank between the undefeated Canaanite Red Chariots
and the successful Amun Chariots. 

View from the Canaanites  side as their army breaks.
Victory to the Egyptians who I think have an advantage in this sort of close in fighting.

Man of the match to the unnamed Nubian Skirmishers.
They ended up with two routs and an assist. Not bad for skirmishers!

Wrap up

Basically the Canaanites were unlucky. Their Chariots lost an even fight and
they couldn't hit a barn door with their javelins! 
I enjoyed the rules though there is a bit of a learning curve. Some of the things that seem a bit off
in the first read through make sense when your playing.
 I even started converting my figures over to the new basing during the game.
Its so much easier to pick up a unit on one base!


Thursday, 12 May 2016

A first look at Impetus basing.

I was quickly painting up a regiment of Canaanites for a game and I thought
I'd throw caution to the wind and base them for impetus.
I did nothing special just glued to the bigger base and added the normal
sand and grass. Though I can see great potential for dioramas.
The style immediately appealed to me even before I'd begun to under coat the base!

Units would look even better with commands not to mention
imaginative touches like bushes or casualties etc.
I was immediately sold and this is the way forward for my ancients.


Friday, 25 March 2016

At Last! The slingers turn up!

Well after months of waiting and then buying another brand that didn't suit then ordering new replacements the original Slingers have arrived for my Canaanite and Syrian armies.
Mean while I've changed and improved some hills and trees.


Friday, 26 February 2016

Bronze Age Iron Age

Well first my Old Glory order didn't show up with the slingers I wanted/needed (it did months later) then my Essex (15mms) that I ordered to replace them arrived with slings that needed attaching. :(  Almost impossible plus I didn't trust them not to fall off during games. So my painting slowed to a crawl for a little while. On the plus side I may be getting better at Chariots.
Some Egyptian Chariots belonging to the Set Division
 
A pair Brit Chieftains and King Aqhat of Megiddo.

Egyptian Archers. Ptah Division.

Some touched up British Chieftains.

Some Bronze age disorder markers.


Tuesday, 12 January 2016

Hail Caesar. Ancient Britons V Rome

I've been wanting to have a of game Hail Caesar rules for a long time. So I dug out my very first army. Early Imperial Romans, 1970s Minifigs. And my Ancient Britons, 1990's Essex. The game was a no nonsense three generals and 300pts and a side engagement with minimal terrain of two woods and a hill. Keeping it simple, I hoped.


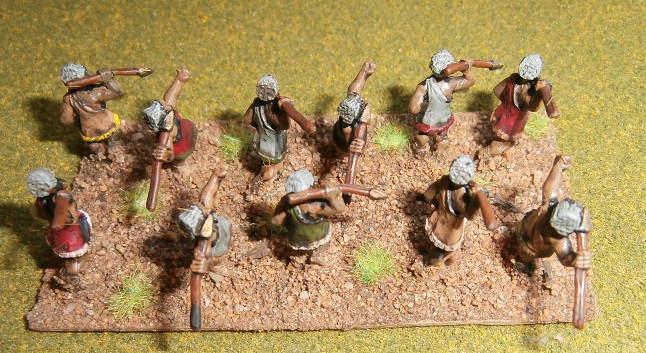
The Britons Centre. Naked Fanatics flanked by 4 large Warbands
 and two small units of Slingers skirmishing in front.

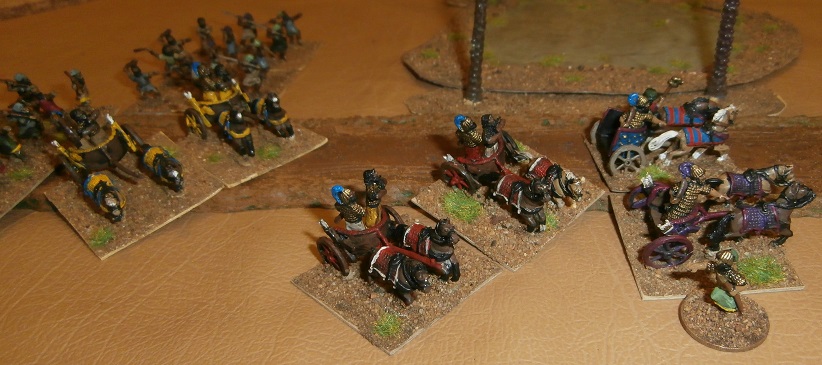
The Britons right wing. Skirmishing light cavalry and Javelinmen backed by
some serious looking gents in Chariots.  The Javelinmen were to hide in the safety of the woods and harass who ever came close enough.

The Briton left wing. Just a some chariots and Light cavalry. Their job was to reach the hill first
 and occupy the Roman right with skirmishing.


First turn. Mission accomplished for the Left wing as they reach the hill with a triple move.
 
The Roman II Cavalry Ala on the left advance quickly around the woods
in an attempt to meet up with the II Auxiliary Cohort.
These two units make up the Roman left command.

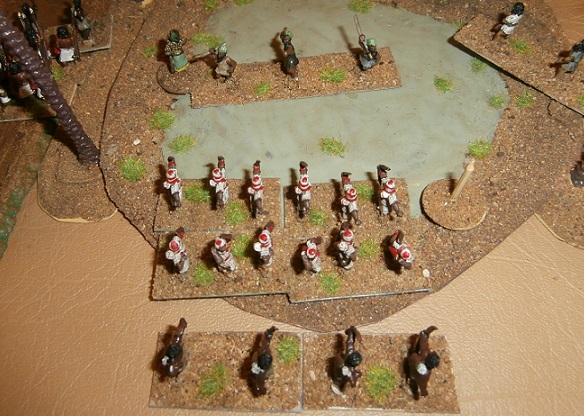
The Roman main line advances.

 
The Roman right wing consisting of the I Cavalry Ala and the I Auxiliary Cohort.

 Turn two on the right and the Britons light horse start skirmishing
with the Auxiliary Cavalry. First blood to the Brits.

The Brits centre eagerly reaches half way.

 The Britons on the left also close to javelin range inflicting casualties on the I Auxiliary Cohort.

The I Ala are trying to charge the skirmishing light Briton Cavalry.
But instead throw a Blunder! I was hoping to get one of these!
 
 This forces the Roman cavalry to make an involuntary left turn and move!
This now leaves A) the Roman wing open and
B) forces them to present their flank to the massed Briton centre.

Meanwhile on the Roman Left.
The II Ala have charged the Brit Light Cavalry which Evaded.
They then continued on towards the Chariots who counter charged.
The Chariots won and the cavalry withdrew back with 5 casualties.
One short of becoming Shaken.

The situation at the end on turn two.


 The Briton right wing Charioteers, with some help from their Chieftain, 
follow up and push back the Roman II Ala again. The Ala have become shaken.
(See Hittite horn blower behind the unit. Never a good sign.)
The Ala keep loosing but refuse to quit the field.
 
Meanwhile on the Britons left.
The Atrebates warband is now presented with the flank of the
I Ala, who had Blundered across in front of them. They attempt to charge and
Blunder themselves! (The odds must be about 1,200 to 1)
 
The Blunder forces them into an unscheduled move to their right.
 A doubly unlucky incident.
 
 A drawn Melee results in both sides withdrawing for a breather.
(The Chariots are now also Shaken and have their own horn blower.)
The II Ala has now become disordered as well.
 
The two main battle lines have clashed!
 
 The V Cohort has become Shaken though has managed to disorder the Dumnonii Warband
with support from the II Auxiliary!
 
The III Cohort has been routed by the Cantiaci!
The Fanatics have Shaken the Ist Cohort but not broken them.
Support from the Praetorian Cohort important in their survival.
 
 The II Cohort is just holding on from the Belgae Warband
with support from the IV Cohort on their right.
 
 The V Cohort continues to push the Dumnonii back
 
 While the centre develops into a bloody Melee!
 
 Things were looking good for the British when the I Ala turned
and Charged the Atrebates in the flank, routing them!
This seemed to trigger a change of fortunes.
 
Turn 4 and the Chariots have finally pushed the II Ala all the way back to their starting position.
 
But then V Cohort routs the Dumnonii Warriors.
 
The I Cohort, with their Praetorian pals, has recoiled the Fanatics.
The Fanatics are now Shaken and so lose their +1 moral save they get for being, well, fanatics!
 
 Britons left hand Chariots. Frustrated with continually missing the I Auxiliary with their javelins charge and break the Auxiliary instead!
 
  The I Ala find another flank to charge. The Shaken Fanatics!
 
 The II and IV Cohorts break the Belgae Warriors!
 
 The II Auxiliary outshoot the Briton Javelinmen who run away.
 
 The II Ala finally win a round of melee over the Chariots who are disordered by the shock!
 
 The Briton Main line breaks! This leaves 4 units facing 8 and so I call it a Roman win.
But a close one!

 
Table at the end.

The game

I thoroughly enjoyed this game. There were big swings of fortune but nothing out of the wargame ordinary and I felt that either side would win at different times. The three Briton foot skirmishers definitely under performed! I don't think they produced one casualty amongst them. One evaded and never managed to obey another order until its division broke. Another got shot a couple of times and routed. The large warbands are real killers. The Romans survived only by very good moral checks.
Man of the match has to go to the I Ala for its successful charge on the Atrebates Warband.
I must have made rules errors but attempted to play the rules as written.

The Hail Caesar Rules.

Hail Caesar manages to tick a lot of boxes. Some, I think, uniquely.
Firstly and importantly to me Skirmishers get to skirmish and javelin men are
 different to Slingers and Bowmen are different to the other.
Secondly a bonus point. Peltasts actually get to change into  skirmish formation, if they want. You always read about that making them unique and yet no rules I've used before have allowed it.
Fourthly. The game seems balanced even though the units were all very different statistically.
Fifthly Hail Caesar strikes me as a flexible set of rules. That could be used for "The wagon Train" scenario as well as a major battle and, I'm guessing, a siege.
Sixth. I like the way range combat is treated. It might not wipe the enemy out with shooting but has the potential to be very disruptive.
Seventh. Seems very adaptable to solo with the random activations and blunders.
Eighth. It really does reward having a reserve.
 was very enjoyable to once again have units recoiling and some routing at first contact while others lost, lost then came back again. It reminded me of WRG 6th but with out the long moral checks and casualty math. I will give them another try.
Negative points.
Trying to find rules in the book that you know you've read but can't remember exactly.
Moving and fighting in woods. Skirmish formations are at no advantage to close formation foot or cavalry. Might fiddle with this just because.
The Moral saves. They seem to follow the amount of protection, then they seem to not. Its the other part of the rules I might fiddle with if I take them up.